What You Need to Know About Joomla 1.6. Part 4: Access Control Levels
My first article on ACL covered one tiny aspect of this system: determining who can see which content once they've logged into the front end of the website.
This article covers "The Full ACL": who gets to create, edit, delete, change the state, manage, administer, and log into the website. Yes, that's basically any permission except for read!
Why would you want to configure this aspect of ACL? You might use The Full ACL in the following situations:
- You have users who should be able to create and edit content for the website, but they can't necessarily publish content. What's more, you have two or more groups of these users who need to create and edit content belonging to different areas of the website.
- You would like a user to be able to edit specific modules, but leave other modules untouched.
- You would like a user to be able to log into the back end of the website, access controls for a single component, and touch nothing else.
Sound exciting? Yes,the controls that The Full ACL brings us for maintaining our Joomla websites are very exciting. But perhaps you feel a headache starting somewhere? That's completely normal. ACL is NOT straightforward or simple to configure. Use The Full ACL with caution. It's possible to completely lock yourself out of your website if you're not careful.
Just because you can doesn't mean you should!
Review
As a refresher, let's define our terms for The Full ACL as it pertains to this article:
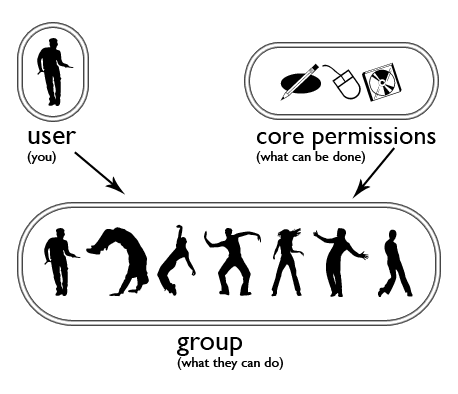
User
This is the easiest one to understand — that's you, or someone else visiting the website. A user does not have to have an account to be considered a user of the website. That user would still be considered a public user. Individual users may be assigned to one or several groups. You cannot assign core permissions directly to users; these are assigned to the group.
Core Permissions
Core permissions are assigned to the group, not to individual users. (If you want specific core permissions for a single user, you would need to create a group for that single user.)
Core permissions include:
- Site login: the ability to log into the front of the website.
- Admin login: the ability to log into the back end of the website.
- Admin: administrative (root) privileges, such as changing Global Configuration, as well as assigning permissions.
- Manage: ability to change settings on extensions, including templates.
- Create: ability to create new content.
- Delete: ability to delete (trash) content.
- Edit: ability to edit existing content which is not necessarily your own.
- Edit state: ability to change state between published, unpublished, trash.
Group
A group is a group of users who share the same permissions. Using the Joomla 1.5 groups as an example, the publisher group has the right to log into the front of the website, create new articles, edit any articles on the site, and publish or unpublish articles. Anyone in the publisher group has the same permissions to do these same things.
Unlike Joomla 1.5, however, a user may be assigned to multiple groups. A user may be in the publisher group as well as the administrator group, for example.
You can create your own groups and assign them their own set of core permissions. Core permissions are inherited between groups.
A group might be created for two different reasons. One would be to view content on the front end of the website (covered in a previous article). The other would be to specify what content can be created, edited, deleted, published or unpublished, managed, or administered by that group, which this article covers.
By visiting the website, a site visitor is considered a user belonging to the public group.
The public group and the registered group may not be deleted, but all other groups may be deleted. (However, I'd recommend you keep all groups, because they give you a good model of how permissions inheritance works.)
The Default Groups
By default, Joomla 1.6 comes configured with the same groups as appear in Joomla 1.5. The groups and their core permissions are as follows (consider singing along to "The 12 Days of Christmas" while reading):
- Public: Public can see the content on the front end of the website that is not hidden behind a login. They have no core permissions.
- Registered: Registered users can log into the front end of the website only. Registered users are children of the Public group. They are assigned the Site Login permission.
- Author: Authors can create their own content via the Create permission. Authors are children of the Registered group. They inherit the Site Login permission from Registered users.
- Editor: Editors can edit any content on the site via the Edit permission. Editors are children of the Author group. They also inherit the Create permission from Authors and the Site Login permission from Registered users.
- Publisher: Publishers may publish, unpublish, or trash content via the Edit State permission. Publishers are children of the Editor group. They also inherit the Edit permission from Editors, the Create permission from Authors, and the Site Login permission from Registered users.
- Manager: Managers may delete content via the Delete permission and log into the back end of the website via the Admin Login permission. Managers are children of the Public group, so all permissions previously assigned to Registered, Author, Editor, and Publisher groups do not apply to Managers. They must all be reassigned individually.
- Administrator: Administrators are able to edit and configure extensions (this now includes templates!) via the Manage permission. Administrators are children of the Manager group, so they inherit the Site Login, Create, Edit, Edit State, Delete, and Admin Login permissions from them.
- Super Users: Super Users (formerly Super Administrators) are able to change Global Configuration as well as other abilities via the Admin permission. Super Users are children of the Administrator group. They inherit the Manage permission from Administrators and the Site Login, Create, Edit, Edit State, Delete, and Admin Login permissions from Managers.
The default groups and their permissions are represented in the Global Configuration (under Site - Global Configuration - Permissions).
Understanding Core Permissions in Global Configuration
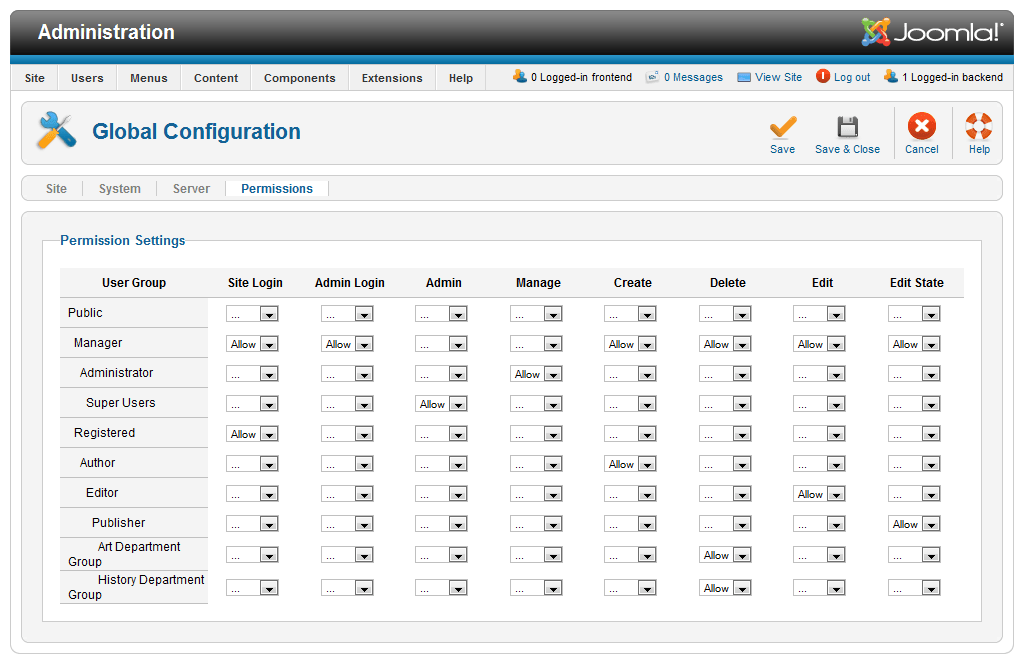
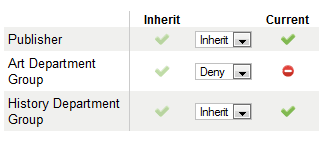
Each one of the dropdowns shown here has three options: Allow, Deny, and ... I've shown the Create permission from the Publisher group above, but all dropdowns are the same.
- Allow means something is explicitly allowed or permitted for a specific group.
- Deny means something is explicitly denied or not permitted for a specific group.
- ... means the permission is not set. If a permission is available from lower level groups (the groups listed above it in the table), it will inherit that permission. If there are no settings to inherit, this permission is denied.
Read across each row to see the permissions set specifically for a given group. For the Public group, there are no core permissions set. As you might expect, Public users are not allowed to log into the front end of the website, among other permissions. They are not explicitly denied from doing this, however — they are denied because there is no permission explicitly set.
For the Registered group, the Site Login permission is allowed. Everything else is not set. Registered is a child of Public, so it does not inherit any core permissions.
For the Author group, the Create permission is allowed. Author is a child of registered, so it inherits the Site Login permission from Registered. Remember that ... means to inherit from a lower level group (Registered), or deny if there is nothing to inherit.
Follow the examples for Editor and Publisher. Editors are allowed to edit plus inherit Create and Site Login from lower groups. Publishers are allowed to Edit State plus inherit Create, Edit, and Site Login from lower groups.
Note the Manager has several permissions assigned: Site Login, Admin Login, Create, Delete, Edit, and Edit State. Note too that Manager is a child of Public. Because Manager inherits no core permissions from Public, it must have those permissions set in this screen. Administrators add the Manage permission, while Super Users add the Admin permission.
Special note: Historically, Authors have been able to create content as well as edit their own content (but not all content as with the Edit permission). This is not possible in Joomla 1.6 Beta 6, but it has been flagged as a bug. It seems that the Create permission will also allow editing of the user's own content once it is fixed.
All About Deny
You might be tempted to set all of these dropdowns to specifically say Allow or Deny so it's easier to read.
However, I would strongly encourage you NOT to do that.
If Deny is set in the permissions, even if you set an Allow for a higher level user group, the lower level Deny would be inherited and would override the Allow.
For example, if you set the Public group dropdowns to Deny for all, there's no point in having any higher level groups! Everyone would be denied from doing anything on the website forever. That would also mean you're locked out of the website as a Super User. (Locked out of your site? Read below to find out how to get back in.)
I Want Different People To Edit Different Content On My Site
For our school site, we'd like to have two teachers, Ms. Jones (who teaches history) and Mr. Smith (who teaches art) to be able to make additions and changes to the website.
These teachers should be able to create, edit, delete, and publish content on the website. They should be able to do this from the front end or the back end of the website. However, they should be restricted to completing these tasks for their class only. They should not be able to touch anything elsewhere in the website.
For the sake of simplicity, we'll assume that all content is readable by the public on the front end of the website. This does not have to be the case, though. We could set this up such that students in each class are able to read the content, but not the general public. To learn how to do that, see the first article on ACL.
Our approach will be as follows:
- Create our groups, called "History Department Group" and "Art Department Group". They will be children of the Publisher group, which has most of the permissions they require. (Remember that a user must be in a group as permissions are assigned to groups and not to users. Even if you have only one person, they must still be assigned to a group.)
- Assign core permissions to our group. In this case, we're assigning the Delete permission, which the Publisher group does not have.
- Create our users and assign them to groups. I'll create a user called "Ms. Jones", who is in the History Department Group, and another called "Mr. Smith", who is in the Art Department Group.
- Create a category and assign permissions for Ms. Jones called "History Category" and a category for Mr. Smith called "Art Category".
- Create articles for the History Category and Art Category.
- Create a category list layout for the History Category and another for the Art Category. These will be visible by the public on the front end of the website, but only editable by the users in the History Department Group and the Art Department Group.
- Test our logins and see if they work correctly.
1. Create Our Groups
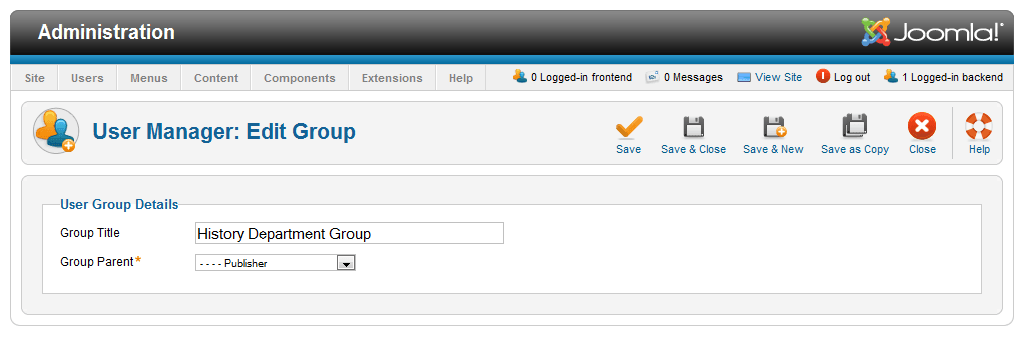
- Go to Users - Add New Group.
- Enter History Department Group as the Group Title.
- Choose Publisher as Group Parent.
- Click Save & New.
- Enter Art Department Group as the Group Title.
- Choose Publisher as the Group Parent.
- Click Save & Close. You now have two new groups.

2. Assign core permissions to our groups.
In this case, we're assigning the Delete and Admin Login permissions, which the Publisher group does not have.
- Go to Site - Global Configuration - Permissions
- Set the Delete permissions for the Art Department Group and History Department Group to Allow. Remember that they will inherit Create, Edit, Edit State, and Site Login permissions from the Publisher group and its parents.
- Click Save & Close.

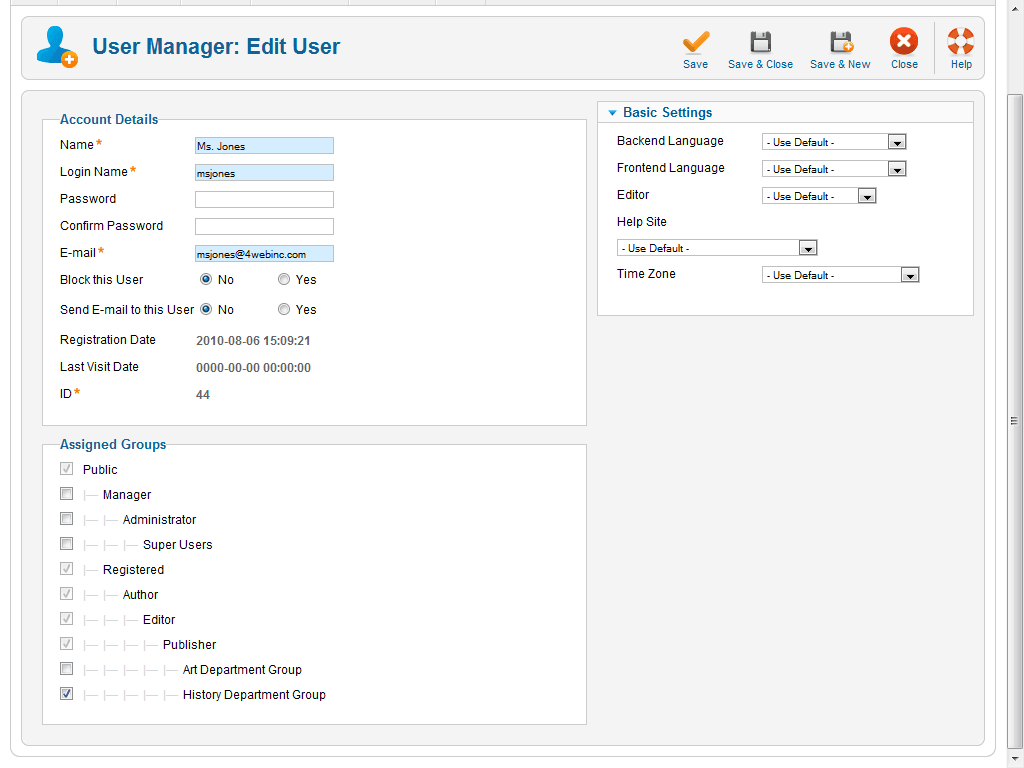
3. Create our users and assign them to groups.
I'll create a user called "Ms. Jones" and another called "Mr. Smith" for our example.
- Go to Users - Add New User
- Enter Ms. Jones' name, login name, and email, and assign her to the History Department Group.
- Click Save & New, and repeat this process for Mr. Smith, assigning him to the Art Department Group.
- Click Save & Close.
4. Create a category and set permissions
We'll create two categories, one for the History Department Group called "History Category" and a category for the Art Department Group called "Art Category".
- Go to Content - Category Manager
- Click New
- Enter the category information as follows:
- Title: History Category
- Parent: No Parent
- State: Published
- Click Save & New, and repeat:
- Title: Art Category
- Parent: No Parent
- State: Published
- Click Save & Close.
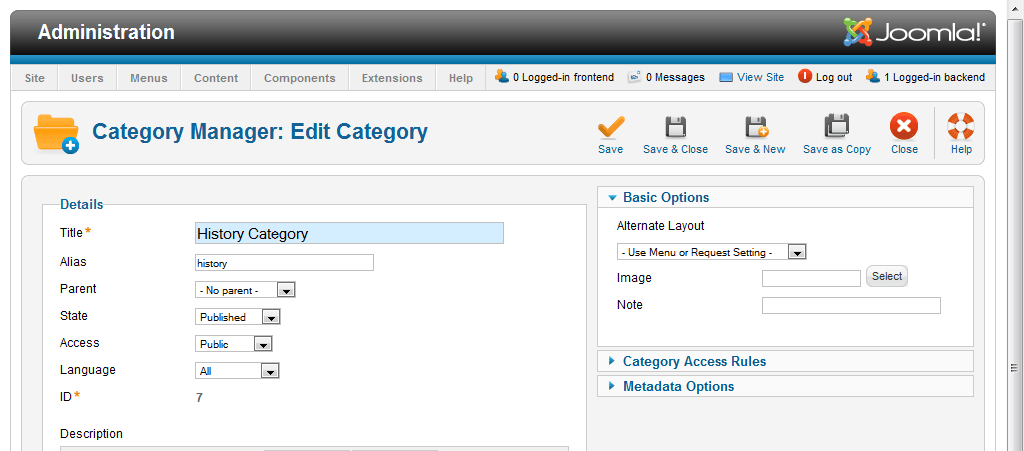
Next, under Category Access Rules on the right side of the screen, check the summary of options.
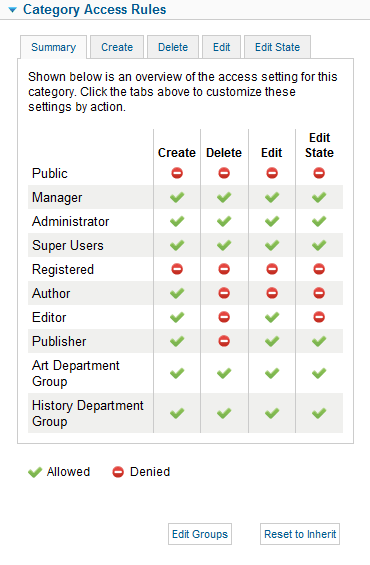
This is a summary of the create, delete, edit, and edit state permissions for this specific category (in this case, History).
Note that the Art Department Group and History Department Group have the same permissions as the Publisher group, except for Delete, which was added to these groups in step 2, in the Global Configuration.
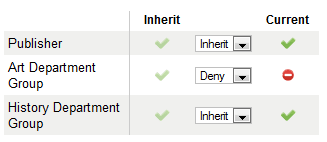
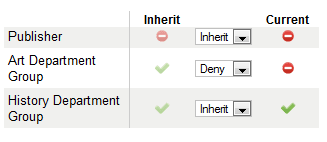
Now, we'd like to set this so that the History Department Group is able to create, delete, edit, and edit state for the History Category, but the Art Department Group is denied from doing any of these actions.
Clicking through the tabs on top, the screens are set up in the following way:
Create:
Delete:
Edit:

Edit State:
Final Summary:
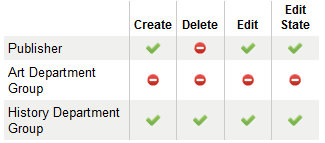
To draw some conclusions from this:
- Art Department Group may not change anything in the History Category.
- History Department Group has full control: create, edit, delete, edit state
- A standard Publisher is also able to create, edit, and edit state in the History category.
- If you wanted to exclude Publishers from create, edit, and edit state, you should create the History Department Group as a child of Public, rather than a child of Publisher. This could give them the ability to be the only group who could create, edit, edit state, and delete content within the History Category.
Repeat the same process with the Art Department Group and the Art Category. The end result should be this:
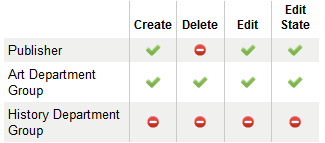
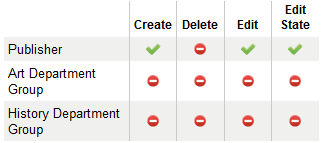
Note that for every other category on this website, the Art Deparment Group and the History Department Group should not be able to make any changes to the content. That means for any remaining categories on the website, you'll need to configure them like this:
When ACL is working correctly (which it is not yet in Joomla 1.6 beta 6), the permissions on the category should cascade to the article. By setting permissions at the category level, the users creating articles do not need to set permissions for each individual article. That's pretty important to your maintenance plan, because understanding how to set the permissions correctly can be difficult!
5. Create articles for the History Category and the Art Category.
We'll create two articles for each category as an example, but you may create more if you wish. Be sure to set the category for each article correctly (to either the History Category or the Art Category) and make sure the articles are published.
6. Create menu items for the History Category and the Art Category.
All articles will be visible by the public on the front end of the website, but they only editable by the History Deparment Group and the Art Department Group. (If you want to make them visible to select audiences, this is where access control levels come in. They were covered in a previous article.)
I am creating two category list layouts, one for the History Category and one for the Art Category.
7. Test our logins
I've logged into the site as Ms Jones. I've gone to an art article, page, but I have no edit icon:

But if I go to a history article, I can edit that.

Be aware that in setting up this example, you may encounter two bugs along the way.
- No matter how you're logged in, you can create a new article in any category you choose. They all show up in the category dropdown menu. However, once you've created the article, you won't be able to edit it.
EXAMPLE: Log in as Ms. Jones, create an article for the Art Department Category. Save, publish — it shows up in the category list layout. However, you will not be able to edit the article.
- In editing an article in Firefox 3.6.8 on PC, I was unable to click the Save button and have it work. Save worked for creating an article but not editing it.
I'm Locked Out Of My Site
It's possible to lock anyout out of the back end of the website — including Super Users with Admin permissions — by setting the Site Admin permission to Deny. That could happen specifically at the Super User group or at the Manager or Administrator group level. If Manager or Administrator is set to Deny, the Super User would inherit Deny from these groups, even if the Super User group is set to Allow.
Fortunately, there is a "back door" that will let you log into your website again. You must have access to the files on the web server in order to make the back door work. You can either use FTP to access the files, or you can go through your site's control panel to a file manager and edit the files on the server.
However you access your files, you'll need to edit the configuration.php file, located in the root of your website. You will need to know the Super User username or their ID. Let's assume that the Super User username is johnsmith for this example. (For security reasons, it's strongly recommended that you use something other than admin as a username for your Joomla site.)
Add this line of code to the bottom of configuration.php:
public $root_user="johnsmith";
If you would prefer, you could also use the ID of the user (although it's less likely you'd know this without looking up the number in the database):
public $root_user="42";
Thank you to Brian Teeman, for providing the title, helping to revise and edit the article, and for testing the example to make sure it works.


 Ленты новостей
  Some times we all have enough of networking online and want to meet in person. Even website enthusisats want the chance to sit in the same room, talk, laugh, share successes, share frustrations and discuss Joomla.